Wednesday, September 16, 2015

Debugging your Seed method when running Entity Framework's Update-Database Powershell command

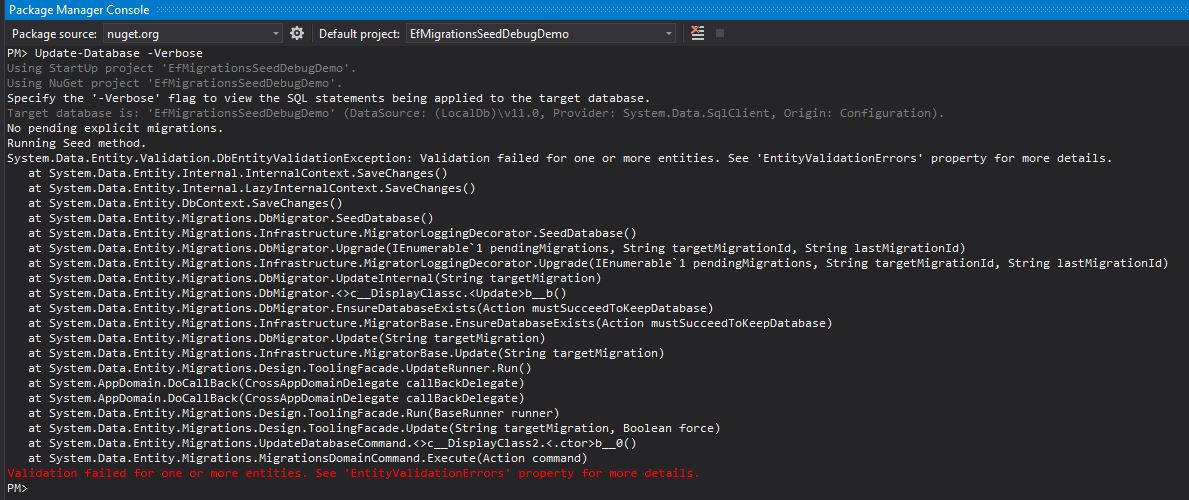
Sometimes when running the Update-Database Powershell command when using Entity Framework's Code First development model, you can have an exception generated within your Seed method. Sadly, this is only communicated to you via the Powershell window:


By default, as the Seed method is not being executed within a context which has a debugger attached, there is no way to interact with the exception as it occurs or set a break point within the Seed method to step through the code as it executes.

Wouldn't it be nice if you could take advantage of Visual Studio's debugger and interact with the code within the Seed method to get to the bottom of that pesky exception? Thankfully this is possible with a little bit of custom code that instantiates a new debugger if one is not already attached. Using code to instantiate a new debugger?! Surely this is not possible I hear you asking... I did not know this was possible either until I hit this problem and this piece of code made me smile, ALOT!

if (System.Diagnostics.Debugger.IsAttached == false)
  System.Diagnostics.Debugger.Launch();

That is all there is to it. This code will determine if a debugger is already attached to your execution context. If not, a dialog is displayed allowing you to select what debugger you would like to attach:


As you can see from the capture above, you have the option of opening a new instance of Visual Studio to debug in or not opening a debugger at all. Note, you can also specify the version of Visual Studio you want to use. How cool is that? Hold on, it gets better.

If you select to debug in a new instance of Visual Studio 2013, Configuration.cs will open in a new window and display the warmly welcomed user-unhanded exception dialog as it occurs within the Seed method:


From here you have all the familiar functionality to drill into the exception details to determine what went wrong. Nice. There is still more though.

You can even set a break point in the debug instance of Visual Studio within the Seed method and step through the code as it executes:


Now that is seriously cool.

I generally add this piece of code to the top of my Seed method so the magic can happen whenever I execute the Update-Database Powershell command. However, if you are updating your data model frequently, you may only want to include this code when you have a problem with the Seed method (or any other code being executed as part of the Update-Database process).

You can find a project here which illustrates this in action. All you will need to do is open it in Visual Studio 2013, build it to restore the packages (ensure you have NuGet version 2.7+ installed - see here for why) and run Update-Database from the Package Manager Console.

Tuesday, September 8, 2015

Getting Inside Angular: $scope.$evalAsync

If you want something to be executed while a digest is in progress, then $scope.$evalAsync is probably what you're looking for.

What does $scope.$evalAsync do?

When a digest is in progress, Angular is looping through all the watches and comparing values to detect if any changes have occurred. As the listener function from a watch could cause a change to another watched property, this loop can run multiple times per digest. $scope.$evalAsync adds the supplied function to a queue that will be drained at the beginning of the next loop in a digest cycle. It won't wait for the current digest cycle to complete but will execute the $evalAsync'ed function before starting the next loop through all the watches. If a digest is not in progress, one will be scheduled when a function is added to the async queue.

When would you want to use it?

A good explanation of when you would want to use $scope.$evalAsync can be found here: http://stackoverflow.com/questions/17301572/angularjs-evalasync-vs-timeout

In summary, as it queues work to occur outside of the current stack frame:
  • In a Controller: it will run before the DOM has been manipulated by Angular (take caution as your change could be overwritten) and therefore, before the browser renders
  • In a Service: it will run after the DOM has been manipulated by Angular but before the browser renders
If your change is going to affect something that is being rendered, $evalAsync will prevent a flicker from occurring as its work will occur before rendering.

Example

 1
 2
 3
 4
 5
 6
 7
 8
 9
10
11
12
13
14
15
16
17
18
19
20
21
22
app.controller('MainCtrl', function($scope) {
  $scope.name = 'World';
  
  $scope.$watch(
    function (scope) { return scope.name; },
    function (newValue, oldValue, scope) {
      
      console.log('First watch executed \nAdding $evalAsync');
      scope.$evalAsync(function (scope) {
        
        console.log('$evalAsync executed');
        scope.newValue = "new value!";
      });
    }
  );
  
  $scope.$$postDigest(function () {
    
    console.log('$$postDigest executed. Digest completed');
    console.log($scope.newValue);
  });
});

View on Plunker (open the developer tool's console).

The above example ensures that $evalAsync is being called (line 9) during a digest by calling it in the listener function of a watch. The work that is being added to the async queue logs a message out to the console to indicate that the work has been executed and then updates a value on the scope. Line 17 adds a function to the post digest queue* to indicate when the digest has completed.

From the output it is clear to see that the function that was added to the async queue was in fact executed during the already in progress digest.

*The post digest queue is drained once all the change detection loops of the watches have completed and is the last step of a digest that you can interact with. However, the Angular team would prefer that you don't use it--or that you take great care if you do--by marking the $$postDigest function private by prefixing it with two dollar signs.

Performance considerations

Adding to the async queue is either going to cause a new digest to occur or if one is in progress, for it to loop one more time through the watches. If the queued work causes changes to other properties that are under watch, this will lead to additional loops. Angular has a mechanism to prevent a digest from continuing forever and will only allow 10 loops to occur before the digest is terminated (known as TTL: Time To Live). As you cannot control at what point during a digest (in other words, how many loops it has already performed) your work is being added, it could be approaching its TTL limit. This is something to consider when using $evalAsync.

Versus $scope.$applyAsync

Both $applyAsync and $evalAsync are tools that help you get around "$digest already in progress" errors. In my opinion, $applyAsync is the safer option as this queue will be flushed before a new digest begins. This will reduce the likelihood that your work will cause a digest to be terminated due to reaching the TTL limit. There is the potential though that using $applyAsync will cause a flicker as you will be relinquishing control back to the browser before your queued work is executed. If the browser decides to render first, then a flicker could occur. Some might prefer $evalAsync for this reason as it won't leave them at the mercy of the browser's event loop.

//Code, rinse, repeat

Tuesday, August 25, 2015

Getting Inside Angular: $scope.$applyAsync

Have you ever used $scope.$apply and received a "$digest already in progress" error? If so, $scope.$applyAsync might be what you should be using!


What is $apply actually doing?

The most common reason to use $apply is when something is happening outside the scope of Angular and you want Angular to react to any changes that have occurred. $apply is your way of instructing Angular that something has happened and that it needs to go through its change detection routine--in other words, perform another digest. You might have noticed that "digest" was also mentioned in error message. This is no coincidence.

When you call $apply, it first executes the function that was supplied and then immediately starts a new digest cycle. In preparation to start a new digest, it checks that one is not already in progress before doing anything and if one is, the above exception is thrown. This can be somewhat jarring because you have little control over when Angular is performing a digest.

What’s the solution?

A common solution that I've seen is based on the fact that the function you want to $apply doesn't actually have to be "applied" at this moment in time and can wait to be executed at some point in the very near future. This is achieved by wrapping the $apply statement in a setTimeout with a very small timeout value, normally zero:

setTimeout(function () {

  $scope.$apply(function () {
   
    console.log('This will also work as you are using setTimeout');
  });
}, 0);

While this is all and good and will solve this issue in the majority of cases, there happens to be a more efficient mechanism already built into angular: $scope.$applyAsync!

Note: If the supplied function needs to been executed during the already in progress digest cycle, $evalAsync is probably what you're looking for.

$scope.$applyAsync

$applyAsync looks the same as $apply, but instead of starting a new digest immediately, it will schedule one to start in the very near future. The benefit of using $applyAsync over wrapping $apply in your own timeout, is when another digest cycle starts before the one that you scheduled does. If this happens, then the function supplied to $applyAsync will be executed before the change detection routine starts; when this wouldn't be the case If you had used your own timeout. The order of execution is up to the browser to decide what is next so by using $applyAsync, you are guaranteed that your function will be executed during the next new digest.

Example:

app.controller('MainCtrl', function($scope) {
  
  $scope.$watch(function () { },
    function (newValue, oldValue, scope) { 
      
      scope.$apply(function () {
        
        console.log('This will not work');
      });
    }
  );
    
  $scope.$watch(function () { },
    function (newValue, oldValue, scope) { 
      
      scope.$applyAsync(function () {
        
        console.log('This will work as you are using $applyAsync!');
      });
    }
  );
}); 

View on Plunker (open the developer tool's console).

The above code shows one example where a $apply is being called during a digest cycle which will result in a "$digest already in progress" error (open the developer tool's console to see this). The second example uses $applyAsync and the message "This will work as you are using $applyAsync!" will appear in the console.

//Code, rinse, repeat

Monday, July 27, 2015

How to Use Bootstrap (CSS only) and Webpack

I thought it was going to be easy.

require("bootstrap-webpack");

I thought that with a single line of JavaScript, I could have Bootstrap available for use within my web application. However, that was not to be the case. After battling through Webpack producing errors about CSS, woff2 and various other issues, I finally reached my limit at:

Uncaught ReferenceError: jQuery is not defined

I'm sure I'm not the first person to run into this issue (a quick Google produced this solution) but what pushed me over the edge was that I only wanted Bootstrap for it's CSS; I had no need to add jQuery as I wasn't going to use any of Bootstrap's JavaScriptiness. As far as I was concerned, this was another hoop and I wasn't going to jump through it.

With invigorated motivation and a fierce sense of purpose, I set out to get Webpack running with Bootstrap's CSS and nothing more. There had to be a way where I could load bootstrap.min.css and that is what I sought out. 


From my previous attempts to use bootstrap-webpack, I felt that if I had the correct Webpack loaders installed and configured correctly, Webpack should be able to load the CSS file. After playing around with adding and removing loaders, I settled on five that appear to be the bear minimum you need:
  • babel-loader: to transpile the "require" keyword
  • css-loader & style-loader: for processing CSS
  • file-loader: for handling "eot" resources
  • url-loader: for handling woff, woff2, ttf & svg resources

I expect that as Bootstrap evolves, this set of loaders will change but as of v3.3.5, these are all you need.

webpack.config.js:

module.exports = {
    entry: {
        app: ["webpack/hot/dev-server", "./app/app.js"],
    },
    output: {    
        path: './app',
        filename: 'bundle.js'
    },
    module: {
      loaders: [
            { test: /\.jsx?$/, exclude: /(node_modules|bower_components)/, loader: 'babel' },
            { test: /\.css$/, loader: 'style-loader!css-loader' },
            { test: /\.eot(\?v=\d+\.\d+\.\d+)?$/, loader: "file" },
            { test: /\.(woff|woff2)$/, loader:"url?prefix=font/&limit=5000" },
            { test: /\.ttf(\?v=\d+\.\d+\.\d+)?$/, loader: "url?limit=10000&mimetype=application/octet-stream" },
            { test: /\.svg(\?v=\d+\.\d+\.\d+)?$/, loader: "url?limit=10000&mimetype=image/svg+xml" }
      ]
    }
};

The loaders were configured as above. Most of this was extracted from the configuration for bootstrap-webpack. The only change of note was updating the test for the url-loader to match both woff and woff2.

This solution is perfect for use with an Angular application where you are using angular.ui. Adding Bootstrap's JavaScript and jQuery in this scenario would be a waste as angular.ui provides the same set of features. 


Oh, and with the Babel-loader installed, you are free to use ES6 to your heart's content!

Feel free to check out the repo on GitHub

//Code, rinse, repeat

Monday, July 20, 2015

The Importance of a Pet Project

A pet project is a great way to learn a new technology or get a better understanding of one you are familiar with already. It’s also a fun way to learn.

Here are a few “rules” I have found along the way after having nurtured a few pet projects of my own:
  1. Come up with a project that is not too big or complex. I want to be able to concentrate on exploring the technology instead of battling with the complexities of the project itself.
  2. The more fun a project is, the better chance you have at actually making good progress with it. As you are doing this in your own time, you want something that is interesting to keep you motivated otherwise it is too easy to find something else that needs to be done instead.
  3. Aim to build something that has a well defined feature set. It is too easy to start playing with a technology without an end goal in mind. By setting yourself some goals or features, it forces you to look at utilizing the technology with an end goal in mind.
  4. Be prepared to learn more than you expect – More on this below.
  5. Share what you have built. Sharing the end product with your peers is an excellent way to get some additional learning miles out of your pet project and new ideas.
The biggest surprise I constantly find is that I end up learning a lot more than I envisaged at the start of the project. For example, my latest pet project (Sharpen the Dev Saw) I wanted to learn more about building a client-side JavaScript app and responsive design using Bootstrap. When I sat back at the end of the project and looked at what I had actually covered, it was a lot more:
  • Working with Knockout.js
  • JavaScript design patterns (MVVM, Revealing Module)
  • A better understanding of JavaScript as more than a scripting language.
  • CSS 3 animations using animate.css
  • CSS 3 transitions for hover states
  • Unit testing JavaScript using Jasmine
  • Working without JQuery
  • Flat UI web design
  • Displaying information concisely when using a Flat UI design
  • Modern input interactions using CSS animations
  • Using a light weight IDE - Brackets
  • Using Grunt as a build automation tool
  • Auto-deploying to Azure using Git and Grunt
As you can see, that is quite a list and I probably have missed some items off there as well.

Sharpen the Dev Saw was a straight forward pet project. As a keen believer in Continuous Learning, I am sometimes asked how you fit continuous learning into daily life. I used to explain that 30 minutes a day does not sound like much each day but over the course of a year it adds up to quite a lot of learning. I usually then had to do the sums to back this up (it’s 10950 minutes or 183 hours a year!). I wanted an app that visually displayed this and then gave some examples of what you could achieve with this time. Hence, Sharpen the Dev Saw was born. As the project itself was simple I was able to concentrate on exploring technologies to get it to work how I wanted instead of becoming bogged down with project complexities.


My pet project prior to Sharpen the Dev Saw was an online portfolio site. I originally planned to build a standard portfolio site using a master-detail design. In the end, I went with a totally different design and learnt about building Parallax Scrolling sites instead. Feel free to check it out here.


Another pet project came following a chat I had with a senior manager at a previous employer. They wanted to make a project’s or software release cycle’s progress more visible as all the stats were buried in Team Foundation Server. This chat lead to me building MVC Dashboard as a demo dashboard app with a Metro design. You can see MVC Dashboard here.


So what’s next? I would like to add some automated UI tests to the deployment pipeline for Sharpen the Dev Saw which are run once the deployment to Azure is complete. Also, I wouldn't mind looking into re-writing Sharpen the Dev Saw using TypeScript too. However, my next pet project is calling - a Continuous Learning Management app built with AngularJS and ASP.NET WebAPI. Here comes the sales pitch… Ever spent hours hunting for that blog post you read months ago but could really do with finding now? Want to make all the self study and development you do in your own time more visible?  Have you wondered what tech areas you have spent the last few months looking in to? This could be the app for you. I am hoping it will be an app that will allow you to track what you are learning and gain insights to help you steer your learning efforts in the direction you want. More on this another time though. (It’s an ambitious project and probably breaks rule 1 – Doh!)

You can find the source code for the pet projects mentioned in this blog post here:

Nurture your pet project, it’s an excellent learning tool.

Wednesday, June 24, 2015

Sharpen the Saw with a Podcast

Podcasts are a great way to Sharpen the Saw. You can learn a wealth of knowledge from them on numerous topics. The beauty of the podcast is that you can multi-thread your life with them. You can listen to a podcast whilst doing something else so you do not have to specifically set time aside for it. I generally listen to podcasts when I am commuting to and from work and in the morning whilst getting ready for work. Previously this was time when I would listen to the radio but now I have turned it into a lucrative learning opportunity. Look at it this way, each day I roughly squeeze in an hour and a half of podcast listening-- that's 7.5 hours a week or 390 hours a year. Considering the average podcast is an hour long, that's 390 podcasts a year I am listening to! That is not bad going for doing very little more than I would usually do on a day to day basis.

Below is a very brief summary of the podcasts I am currently listening to:

  • .NET Rocks - This is the first podcast I started listening to. I am quite a religious listener and try to listen to each episode as it's a great way to broaden your technological awareness in general.
  • Hansleminutes - Brought to you by the legendary Scott Hansleman. Each episode is full of his usual humor making them a highly enjoyable listening experience.
  • Herding Code - Great line up of host presenters. I generally cherry pick these as they can have similar material and guests to .NET Rocks.
  • Hello World - There is lots of inspiration and advice to be gleaned from listening to the stories of how influential developers started and progressed their careers. You can read more about this podcast in my blog post here().
  • Adventures in Angular - I have started listening to this to help level up my AngularJS skills. Each show is about half an hour long so you can consume lots of these very fast. It also features one my favorite developers on the panel, John Papa, so it gets a big thumbs up from me.
  • JavaScript Jabber - I have also started to listen to this to help broaden my Javascript knowledge. It's a great way to learn about potentially useful Javascript frameworks (if you do not know they exist, how can you consider using them to solve a problem?) and the world of Javascript in general.
  • EntreProgrammers - This is a great podcast where programmers come entrepreneurs discuss there weekly activities. It's not your standard podcast setup as it's more a recording of them chatting about their entrepreneur activities but it's a great way to get an insight in the entrepreneurial world from a developers perspective. Highly recommended.
There are lots of podcasts freely available on a vast variety of topics and I am barely scratching the surface with the selection I have listed above.

Grab yourself some podcasts, start multi-threading your life and sharpen that saw.

Wednesday, May 13, 2015

Human Readable Code - Fluently Mocking the ASP.NET MVC ControllerContext

I was recently writing some unit tests against an MVC controller action which required a user to be authenticated via Windows Authentication. The test was initially failing as it was not able to access the controller action. This was happen because the context in which the test was being run in did not have an authenticated user.
 

I resolved this issue by mocking the ControllerContext so the controller "believed" it was being accessed by an authenticated user. Using the Moq mocking framework, this can be accomplished using the following mocking code:

var mockControllerContext = new Mock<ControllerContext>();
mockControllerContext
     .SetupGet(c => c.HttpContext.User.Identity.Name)
     .Returns("TestUser");
mockControllerContext
     .SetupGet(c => c.HttpContext.User.Identity.IsAuthenticated)
     .Returns(true);

var homeController = new HomeController();
homeController.ControllerContext = mockControllerContext.Object;

This implementation does the job but it is not particularly readable at a glance. You have to read through each statement to understand which property the mock is setting up a return value for. Unit tests are a great way to understand the workings of a code base as they allow you to see at a high level how the code base is supposed to behave under certain circumstances. However, this benefit is dramatically reduced if the unit tests themselves are long winded and not easy to understand. 

After watching Cory House’s Pluralsight course on Clean Code: Writing Code for Humans I have become acutely aware of the benefits of making your code more human readable. Extension methods are a good way to achieve a more readable syntax and led me to refactoring the above mocking code to the following:


var mockControllerContext = new Mock<ControllerContext>()
                                 .WithIdentityNameAs("testUser")
                                 .IsAuthenticated();

I was able to create this fluent syntax by creating a couple of extension methods that could be chained together to update the mocked ControllerContext object as required.

public static Mock<ControllerContext> WithIdentityNameAs(
     this Mock<ControllerContext> mockControllerContext, string username)
{
 mockControllerContext
          .SetupGet(p => p.HttpContext.User.Identity.Name)
          .Returns(username);

 return mockControllerContext;
}

public static Mock<ControllerContext> IsAuthenticated(
     this Mock<ControllerContext> mockControllerContext)
{
 mockControllerContext
          .SetupGet(p => p.HttpContext.User.Identity.IsAuthenticated)
          .Returns(true);

 return mockControllerContext;
}

The key to writing extension methods that allow method chaining is to return the type which is passed in that the extension method extends. In the case of my extension methods, I had to return the mockControllerContext object or an instance of a Mock<ControllerContext> type as this is what was being extended. As you are returning the same type which your extension method extends, it allows you to call another extension method on that returned object and chain your extension methods together. This chaining makes nice, succinct, readable expressions.

The main draw back with this approach is that you have now moved test setup code away from the unit test itself into a separate extension method helper class. This is not necessarily a bad thing. It helps promote code reuse as you can use these extension methods in many other unit tests without having to duplicate the mock setup code. 

On a separate note, the refactored implementation gives the reader the option of deciding what level of abstraction they want to read the code at. If they only want to understand what is taking place in the test setup, reading the extension method names will be sufficient. However, if they are interested in how these values are actually setup in the mocks, they have the option of diving deeper into the extension methods themselves to view the implementation details. The key point here is that the reader has this option. My first implementation forced the reader to read the details to understand what test setup was taking place, where as my second implementation abstracted these details away. Providing these levels of abstraction to the reader is another technique which can help make your code more readable.